Automate screenshots creation
When working in the Agile team, it's necessary to keep the documentation up to date and monitor changes. It's especially important for those cases, when the team changes and there should be onboarding for the newcomers. Often newcomers are directed to read the documentation, which covers the basic needs. Due to the fact, that we all are humans, we understand by example better. Such examples can be shown in screenshots, but screenshots need to be updated on a regular basis.
Pre-requisites for the web application screenshots
Let's for simplicity spin up CRA by following their official tutorial: https://create-react-app.dev/docs/getting-started
in this example, we will use screenshots-cra for the name of the bootstrapped folder.
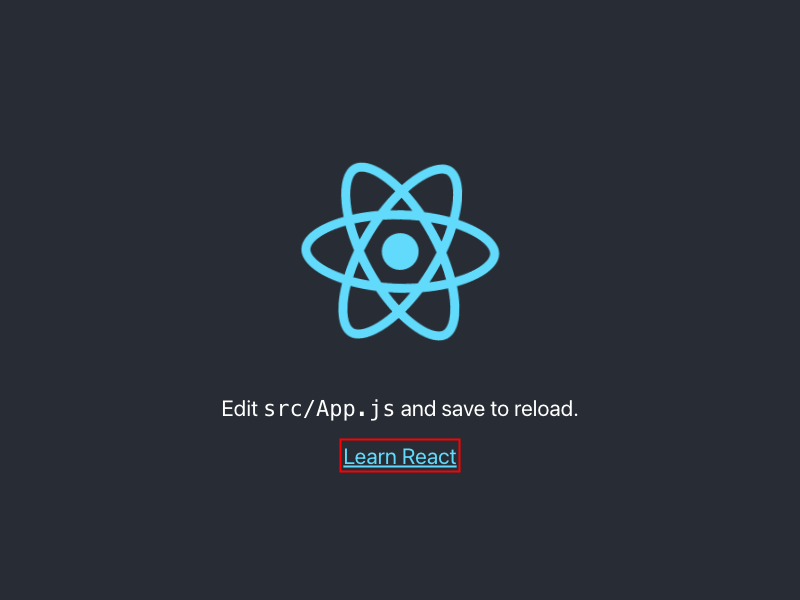
To be able to draw attention to specific part of our page, we would like to select the necessary visual element
let's define following function in the screenshots-cra/src/index.js:
window.highlightElement = (elementQuery) => {
  const element = document.querySelector(elementQuery); // retrieve DOM element for highlighting
  if (!element) {
    return console.error(`Element "${elementQuery}" not found!`);
  }
  element.style.outlineOffset = '2px'; // make outline for the selected DOM element
  element.style.outline = '2px red solid';
  console.log(`Highlighted element ${elementQuery}`);
};
Screenshots generation process
The general practice to make a screenshot is to use some headless browser,
render page there and write output to the file.
In this example will be used puppeteer for achieving screenshot capturing functionality.
Let's also use the dotenv package, so that we can define some environment variables for specifying URL
where we should make the screenshots.
Let's create screenshots-generation.js and fill it with following contents:
const puppeteer = require("puppeteer");

require('dotenv').config();

const url = process.env.URL || 'http://localhost:3000';
const fileNamePrefix = process.env.FILE_NAME_PREFIX || '';

const Screenshot = async () => {
	const browser = await puppeteer.launch();

	const page = await browser.newPage();

	await page.goto(url);

	await page.evaluate(() => {
    window.highlightElement('.App-link');
	});

	await page.screenshot({
		path: `./${fileNamePrefix} app-link.png`,

		fullPage: true,
	});

	await page.close();

	await browser.close();
};

Screenshot();
With the dotenv package, we don't need to hardcode the URL for rendering the page, so
execute following in your terminal: URL=http://localhost:3000 node ./screenshots-generation.js
Background image by Cris on Pinterest: https://www.pinterest.com/pin/601019512773094141/